Sounds like the discussion we had back in post #4. I'm really glad you are measuring everything. I've seen engines built a lot tighter than what Comp Cams gave you, but those numbers should be easily achieved with a mild notch. Take good pictures. I promise there is someone out there trying to duplicate the build you are doing that doesn't want to have to measure everything. I saw a couple of these at Ford Nationals last weekend, but wasn't able to talk to the owners.
-
Hello there guest and Welcome to Modular Fox Mustangs home of the 2V, 3V, 4V, Coyote Modular Mustang Conversion Information Website!
To gain full access you must Register. Registration is free and it takes only a few moments to complete.
Already a member? Login here then!
You are using an out of date browser. It may not display this or other websites correctly.
You should upgrade or use an alternative browser.
You should upgrade or use an alternative browser.
Teksid 2V Tech Article (Must Read)
- Thread starter modfoxmustangs
- Start date
Here are a couple pictures of my PTV clearance issue. I used a piece of aluminum flat bar to see how close the intake valve is to the head deck, and it looks like about .068". The piston to deck clearance is about .006", so if my intake valves are open .050" at 4 degrees BTDC (which is what the cam card specifies), you can see the problem...
Attachments

I'm guessing you already know this, but for the sake of less experienced/diligent readers, when you have them notched, be sure to clean up the sharp edges of the machine work to keep from creating a hot spot on the piston. We don't like premature detonation under load. I like a piece of sand paper (800 or finer) just to make me feel better about the work.
Good suggestion, i'll make sure there aren't any burrs. Do you know offhand what the "valve drop" (distance between the lip on the factory intake valve and the head surface) measurement is, or should be? I'm wondering if these heads have been aggressively shaved before i bought them. Do you (Bill, or anybody) currently have a set of heads on the bench? I can't find any information about it so far. ...regards, kevin
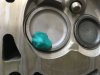
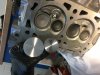
I decided to check the combustion chamber volume on cylinder #1. I repurposed an old CD case, sealed it to the head with grease, and eventually filled the combustion chamber with about 43cc of isopropyl alcohol, using the very precise measurement tool in the photo. So, it looks like the heads have not been cut down by any significant amount. I've been chatting with Dale from ModMax, it looks like their stainless intake valves don't have the deep dish and raised shoulder that the factory intake valves have, and would give me the PTV clearance i need. I'll need to lap them in the heads, but that'll be easier (and cheaper) than pulling out the pistons, driving about 300km to and from a machine shop, paying to cut the pistons and re-installing them. I hope. The factory exhaust valves have significantly more PTV clearance than the intakes, i'm not worried about them.
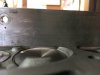
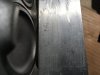
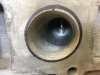
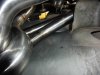
On another note, here's a photo of an exhaust port with the exhaust gasket opening marked with a sharpie. Bill, is there any advantage to matching the long side of the port to the gasket/header, or would that reduce exhaust velocity? ...regards, kevin
On another note, here's a photo of an exhaust port with the exhaust gasket opening marked with a sharpie. Bill, is there any advantage to matching the long side of the port to the gasket/header, or would that reduce exhaust velocity? ...regards, kevin
Attachments
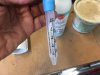
Love the CCing tool setI decided to check the combustion chamber volume on cylinder #1. I repurposed an old CD case, sealed it to the head with grease, and eventually filled the combustion chamber with about 43cc of isopropyl alcohol, using the very precise measurement tool in the photo. So, it looks like the heads have not been cut down by any significant amount. I've been chatting with Dale from ModMax, it looks like their stainless intake valves don't have the deep dish and raised shoulder that the factory intake valves have, and would give me the PTV clearance i need. I'll need to lap them in the heads, but that'll be easier (and cheaper) than pulling out the pistons, driving about 300km to and from a machine shop, paying to cut the pistons and re-installing them. I hope. The factory exhaust valves have significantly more PTV clearance than the intakes, i'm not worried about them.
On another note, here's a photo of an exhaust port with the exhaust gasket opening marked with a sharpie. Bill, is there any advantage to matching the long side of the port to the gasket/header, or would that reduce exhaust velocity? ...regards, kevin
") I have never done a gasket match like that, so I don't know how much value there would be. I don't think I would be worried about exhaust velocity with removing that little bit. I don't know how thick the aluminum is there. I'm hoping someone will chime in and give us the benefit of their experience. I like the idea of gasket matching, as it would increase flow and give you the opportunity to control the exit swirl of the exhaust. I agree that you should have plenty of PTV clearance on the exhaust side. I am interested to see the new intake valves.
I have never done a gasket match like that, so I don't know how much value there would be. I don't think I would be worried about exhaust velocity with removing that little bit. I don't know how thick the aluminum is there. I'm hoping someone will chime in and give us the benefit of their experience. I like the idea of gasket matching, as it would increase flow and give you the opportunity to control the exit swirl of the exhaust. I agree that you should have plenty of PTV clearance on the exhaust side. I am interested to see the new intake valves.rocky_troxell@yahoo.
UndrcvrKiller
I have a Question maybe some one can help with. i have a 95 teksid out of a mark viii, put on some pi heads and did the neccesary work such as drilled the coolant passage and ground some for the timing on the water pump boss. i was checking out my pilot bearing for my clutch, it doesnt seem like it will fit in the crank. the engine is going in a 98 mustang, so i ordered a clutch and parts for a 98 mustang. the engine is on the stand so i didnt really try to install it, i just held it up to the crank. am i missing something here and do i need a dif pilot bearing?
rocky_troxell@yahoo.
UndrcvrKiller
It’s a six bolt crank. I’m going to mess with it some more today. I’m not ready to put it in the car yet. Still getting timing components and some other stuff togetherYou might need to measure the crank and get a pilot bushing that matches the crank
rocky_troxell@yahoo.
UndrcvrKiller
I had one recently that the pilot bearing did not come out in one piece. I was using a slide hammer puller and initially didn't notice that the race had stayed in the crank. You will love the aluminum block/PI head combo in that 98. Which pistons did you go with?It’s a six bolt crank. I’m going to mess with it some more today. I’m not ready to put it in the car yet. Still getting timing components and some other stuff together
rocky_troxell@yahoo.
UndrcvrKiller
I ended up having no issues with the bearing after I took it off the stand and cleaned out some gunk that was in the end of the crank. I kept the stock mark viii internals. Looked like someone tore it down before I got it Becuase it had a piston replaced in it. After I get it all together and running I am going to save up for a forged rotating assembly 20 over. Right now with the pi swap and lt headers and some other bolt ones like the Ford performance pi intake and a cai I should be happy. The main problem is just money at this point. Engine and transmission is in the car nowI had one recently that the pilot bearing did not come out in one piece. I was using a slide hammer puller and initially didn't notice that the race had stayed in the crank. You will love the aluminum block/PI head combo in that 98. Which pistons did you go with?
Attachments
rocky_troxell@yahoo.
UndrcvrKiller
Yes they do. And, the suck is brand specific.And for the record, LT headers suck so much installing on these cars
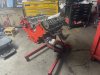
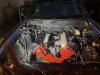
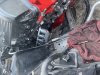
Headers are quite the project, alright. Drop the K-member, lower the engine, break off the dipstick tube, pull off the pan, drill out the dipstick tube, bolt on the headers, reinstall the K-member. That was the first session, took 4 days, and of course, i had clearance issues. Second, third, fourth, fifth and sixth sessions, drop the K-member, "dimple" a primary on the driver's side, reinstall... On a positive note, there is value in practice! The first time, i bagged and labelled every fastener, did photos of everything and watched every video i could find. The sixth and final session took 4 hours, and i threw everything in a bucket as i pulled it off. You learn something every day, whether you want to or not...
,,,regards, kevin
,,,regards, kevin
Attachments
The project has come back to life. There's a delay in manufacturing and transporting valves this summer, i'm sure i'm not the only person to notice this  I'm attaching a photo to show the difference between the factory (i think) Ford valves and a set (i decided to replace both intake and exhaust) of Manley stainless valves. Note the flat surface on the Manley valves compared to the factory units. I'm hoping this will address my intake PTV issue. The heads are in the shop for verifying/setting the stem length and making sure they seat properly. Fingers crossed, eyes crossed...
...regards, kevin
I'm attaching a photo to show the difference between the factory (i think) Ford valves and a set (i decided to replace both intake and exhaust) of Manley stainless valves. Note the flat surface on the Manley valves compared to the factory units. I'm hoping this will address my intake PTV issue. The heads are in the shop for verifying/setting the stem length and making sure they seat properly. Fingers crossed, eyes crossed......regards, kevin
Attachments
Sweet...those are some serious replacements. I'm looking forward to seeing how they work out. I have agreed to do another one of these builds in the early spring. It is funny how I go back through my own notes after not having built one in 15+ years and think...crap, I didn't remember that. Please post all the details you can think ofThe project has come back to life. There's a delay in manufacturing and transporting valves this summer, i'm sure i'm not the only person to notice this
...regards, kevin
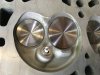
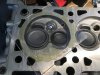
Today i got the new Manley valves installed in the heads. They fit, and with a minimal grind on the valves, they sit nice and deep in the seats. I checked the intake valves clearance to the deck of the heads with my piece of aluminum flat bar, and it looks like about .105". With the factory valves, the clearance measured about .068"... so i've picked up .037"! Going back to my measurements from a previous post where i found .028" PTV clearance on the intake valves at 8 degrees ATDC, i'm hoping that measurement will now be about .065", which would be within spec.
Since the block and heads have been sitting (even though covered in plastic) for a couple months, i'm going to remove, clean and oil the pistons and bores tomorrow before i reassemble and degree the cams... hopefully for the final time!
Here are a couple photos of the new valves installed, and the intake valve to head deck clearance (valve droop).
Fingers crossed, eyes crossed... ...regards, kevin